This is Part 3 of my 4-part blog about leveraging jQuery to take your Lectora® courses beyond “good” into the “awesome” territory. In Part 2, we learned how to move your scripts outside Lectora for quicker access and built a cool word game. This time we’re going to play with jQuery’s best friend—jQuery UI.
Wait, what’s jQuery UI now?
It’s a jQuery extension for building user interface elements like accordion menus, date pickers, sliders, sortable lists, etc. as well as adding animations and effects to those. It can also make anything draggable, which we’re going to take advantage of today.
But there’s already a drag-and-drop question type in Lectora!
True. But we can do more. Bear with me.
Add jQuery UI library to our title.
Simply add one more line of code to load jQuery UI from the web or refer to my previous post to find out how you can add it offline:
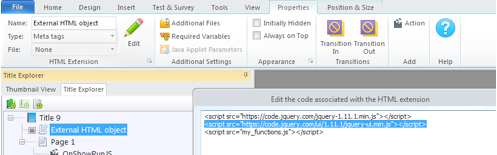
As previously, we’ll keep all our scripting in my_functions.js for easier editing.
Create interface elements.
We’re building a slider, so we will need a draggable handle and a base line for the draggable element to slide along. I just used Lectora’s shapes to create those. We will also need a text counter and a submit button.
To let jQuery identify our interface elements, we need to add classes to them:

Develop the JavaScript.
Here’s the documented code for the dragger and the counter:
// this function is executed on Page Show in Lectora
function init_drag_slider() {
//the minimum X coordinate of our dragger is equal to the left edge of the base line
minimumPosition = $('.base').position().left;
//the maximum X coordinate of our dragger is equal to the right edge of the base line less the dragger width
maximumPosition = $('.base').width() - $('.dragger').width();
//make our "dragger" image draggable
$('.dragger').draggable({
axis: "x", //only horizontal movement
containment: ".base", //contained with the region of the "base" image
drag: function( event, dragger ) { //this function is fired every time dragger moves
//calculate the dragger position between 0 and 1
position = (dragger.position.left - minimumPosition) / maximumPosition;
//convert it into days
result = Math.round(position*365);
//update the counter
$('.counter span').text(result);
}
});
}
//this function is fired when clicking on Submit button
function check_answer() {
//get the counter value
result = $('.counter span').text();
//check for correct answer
if (result == "221") {
alert('Exactly!')
} else {
alert('Hint: There are 94 entirely sunny days and 127 partly sunny days.')
}
}
The great thing about this code is that the dragger is always limited by the size of the slider base in Lectora, so you don’t need to change the code to reuse it, just resize the slider or replace the images.
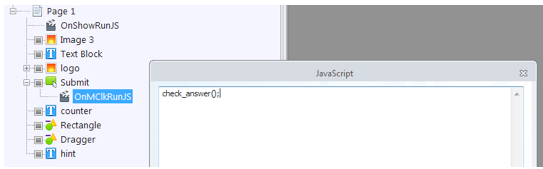
Give it that final touch.
At this point, our interaction is working, but we also need to make sure the check_answer() is fired when the Submit button is clicked. That’s just one action on the Submit button in Lectora:
That’s it—you can publish and test the title now. Or simply take a look at the live preview or download the source title.
Stay tuned for Part 4 where we build a re-useable image zooming interaction!
Subscribe to the Lectora e-Learning Blog for more Lectora how-tos and e-Learning tips.
.svg)
