This is Part 2 of my 4-part blog about leveraging jQuery to take your Lectora® courses beyond “good” and into the “awesome” territory. In Part 1, we learned how to add the jQuery library to your title and extend quiz functionality in a very interesting way.
In this chapter, we’ll look at how to speed up your development and build another cool interaction.
Moving your scripts outside Lectora
I recommend using an external editor like Notepad++, Sublime Text or Brackets to edit your scripts outside of Lectora. To do so, you need to store your scripts in a separate file. This will give you the ability to update scripts quickly without even launching Lectora. So:
1. Create a new file called “my_functions.js” and store it on your desktop. Since Windows often hides file extensions, I usually just grab the nearest existing JS file (like trivantis.js), copy it, rename to what I need and delete everything inside.
2. In Lectora, add another line to the External HTML Object that holds your jQuery script:
<script src="my_functions.js"></script>
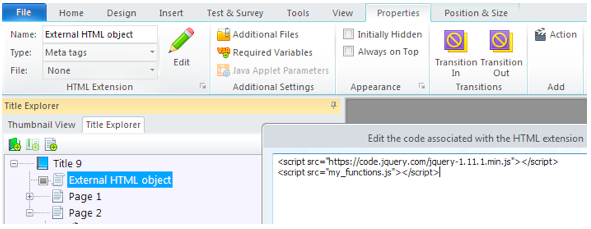
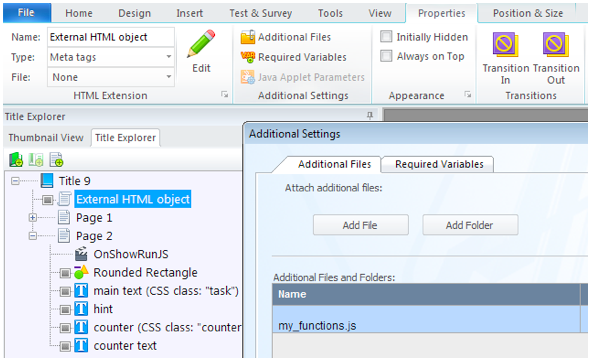
3. Now attach the my_functions.js to the External Object (Properties > Additional Files > Add File). Lectora will copy the file to your project and make sure it’s published with the course.
4. Find the my_functions.js in your project folder (e.g. Documents/My Titles/Title 1/extern) and open it for editing. As a precaution, I recommend deleting the my_functions.js file from your desktop to avoid confusion.
We’re all set to build something great.
Building a word-clicker interaction.
Let’s build an interaction where learners have to highlight certain words in a sentence.
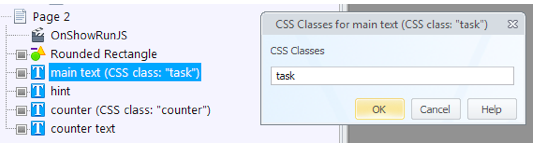
1. Add the first important component—the task textbox. Since we need a way for jQuery to identify it, let’s add a class to it. Click Properties > Appearance > little arrow > type “task”.
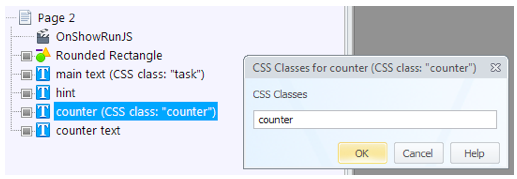
2. Add the other important component—the counter. Again, let’s add a class “counter” to it so jQuery can identify and manipulate it.
3. Add an On Show Run JavaScript action to the page. It will contain just one line of code:
init_word_chooser();
This function will execute after Lectora loads the page and creates all objects on it.
4. The rest of the development happens outside Lectora in the my_functions.js, using your favorite editor. You can even let someone else work on the course while you work on the code.
Here’s the documented code from the my_functions.js:
// this function is executed on Page Show in Lectora
function init_word_chooser() {
//grab the contents of the task textbox
$('.task span').html(function(index, oldHtml) {
//find each separate word using regular expressions and wrap it in a separate span
return oldHtml.replace(/b(w+?)b/g, '<span class="word" data-text="$1">$1</span>')
});
//set counter to the number of words that begin with "S" or "s"
var wordCounter = $('[data-text^="S"],[data-text^="s"]').length;
//store the original count of the words in case we need to reset
var wordCounter_original = wordCounter;
//update the visible counter text
$('.counter span').text(wordCounter);
//grab each word and add make it clickable
$('.word').click(function(event) {
//when a word element is clicked, first get it as a variable
var $clickTarget = $(event.target);
//then get the element's text (i.e. the actual word)
var wordText = $clickTarget.text();
//grab the first letter of the word
//also make it lower case, it'll make comparisons easier
var firstLetter = wordText.substr(0, 1).toLowerCase();
//now let's see, is the first letter "s"?
if (firstLetter == 's') {
//if yes, paint it red
$clickTarget.css('color','red');
//and decrease the counter
wordCounter--;
} else {
//else set all words back to white
$('.word').css('color','white');
//and reset the counter
wordCounter = wordCounter_original;
}
//update the visible counter text
$('.counter span').text(wordCounter);
});
}
5. Save the my_functions.js, publish the course and preview. Check out the live demo or download the whole title.
Bonus part: zooming with Zoomooz.js
Zoomooz.js is a jQuery plugin that was brought to everyone’s attention by Peter Sorenson at the 2014 Lectora User Conference. Among many things that Zoomooz can do, it can resize Lectora content to fit the screen. Super handy if your learners have many screen sizes.
Adding the plugin
Simply download the JS file from the official site. Then, add it as an “Additional File” to the External Object, just like we did with “my_functions.js” file earlier.
Running the plugin
I’ve created a small clickable text box with an action On Click > Execute JavaScript with the following code:
$('#pageDIV').zoomTo({targetsize:1});
In real life, you will probably want to run this code On Page Show, not On Click.
Let’s recap:
- Store your scripts in a separate file for quicker access.
- Add classes to objects on the screen to make them accessible for jQuery.
- You can manipulate the heck out of your course if you want.
Stay tuned for Part 3 where we do less coding yet have more fun while dragging stuff.
Subscribe to the Lectora e-Learning Blog for more Lectora how-tos and e-Learning tips.
.svg)
